There is a classic temptation for those who endeavor to make a video game: to instead make a video game maker, and then use it to build an original game along with other projects. Indie game developers often experience this sensation, facing a trail laden with promises of amazing potential and countless hours saved after a hefty upfront cost. The pull of this temptation comes from a place of knowing, or at least appreciating, the immense amount of labor involved in creating any digital game. However, in the case of Play the Knave and its platform, Mekanimator, this was not only a temptation, but a project goal. In this act, we tell the story of Mekanimator’s design. We paint a picture of its technical aspects and its humanities aspects using the same brushstrokes, accentuating conceptual and empirical issues together. In this manner, we aim to show how platforms evolve along with their applications, and how technical considerations and cultural considerations co-produce one another at every step of the way.[1] A platform is never singular but multiple, and it is as much a product as it is a reactant in the alchemical processes of software development. A platform, like a laboratory, is always more than the sum of its parts.
The initial ModLab planning meetings in 2013 for what became Play the Knave and the Mekanimator platform were attended by nearly all the colleagues in the group. In those meetings, the collective displays of talent, knowledge, and skill were, to put it modestly, inspiring. While there was a focus on defining explicit features and constraints for the project, the atmosphere brimmed with electric creativity. As the project specifics began to take solid form out of the ether, we saw both concrete ideas and guiding philosophies emerge to reflect the ModLab’s spirit. We envisioned Mekanimator as a platform for collaborative digital performances, a flexible tool for creating machinima video content. We wanted it to support local co-op performances, real-time networked performances, and asynchronous performances, for example, allowing users to remix and reanimate previously recorded scenes. Play the Knave would then be a Shakespeare game powered by this platform.[2] Early on, we prioritized the following for Mekanimator:
- software modularity (addressing multiple goals with simple, reusable parts)
- motion capture support (translating data from motion-sensing devices)
- use of existing software (connecting established code in new ways)
Before we began programming, we took stock of the resources available to us. In regard to the technical elements alone, we knew our project would need to draw from myriad areas of computer science and related disciplines—graphics, software engineering, security, networking, data structures and algorithms, physical simulations, and user interface and experience design, to name a few. To build not only a game but also the platform that supports it, additional skills would be needed: scripting and automation, web development, industry-level practices for managing and coordinating developers, project-management strategies, source-control standards, testing plans, and deployment schemes. All of this is to say, even as we held preliminary planning meetings, we could assume that our cumulative body of knowledge and experience would only take us so far before we encountered the hard unknowns, and that progress could be derailed due to an overly ambitious vision. This concern compelled us to avoid building a platform completely from scratch and instead draw upon and modify the rich functionality provided by a well-established game engine.
In those times, the main contenders for an engine were Unity 5 and Unreal Engine 4. Both made fair cases as established engines and ecosystems, allowing us to consider the challenges of the envisioned game more so than the development costs of building the game from the ground up. In either case, the ability to immediately import assets and render a scene was an extraordinary timesaver. Not having to create and integrate core systems such as the rendering pipeline, input system, entity-component system, and so forth was a double-edged sword. For developers, there is sometimes a sense of reluctance when using tools and engines, a feeling that falls in between “We could do this better ourselves (if we only had the time)” and “Why is this engine so weird to work with? We don’t have the time to figure this out!” Such hypocritical feelings are quickly assuaged as familiarity with the technology grows, however, because it becomes clear exactly how much work the engine is doing, and thus, how much work the engine is saving the developers from doing. At the same time, by cultivating an intimate relationship with the engine, developers can better appreciate how it naturalizes certain design choices and engrains certain habits of thought—and also how those choices and habits might be modified, transgressed, or rendered otherwise.[3]
For us, the decision to use Unity came down to the fact that our development team had more prior experience with C# as used in similar projects for MonoGame and XNA. Moreover, at the time, Unity felt like it had more to offer from its user community and its supported asset store. Indeed, the available plugins and character-model packs helped tip the scales toward Unity. But as we looked more into Unity for game development, we observed a common behavior among its users. Often the advice for working with Unity was “Don’t use Unity’s system for ___; do it yourself.” This advice seemed to apply to everything from networking to the rendering system to object instantiation to user interfaces. In hindsight, longtime users of Unity can appreciate the kernel of truth in this advice. Over the years, Unity Software Inc. has had a pattern of releasing official support for an oft-desired, much-needed feature, and then suddenly deprecating it or abandoning it after a short run in favor of a newly reinvented wheel to replace it. This pattern has sometimes left users feeling disillusioned after chasing the engine’s moving standards, often having to repeat previous work just to conform to the latest version update. When developing a game with Unity, one can only hope that the chosen option remains stationary long enough to complete a game. In turn, Unity developers learn that a little mistrust goes a long way, and a team can still develop effectively if they focus on specific versions and features.
After recovering from the sting of frequent updates, we opted for the long-term support (LTS) release of Unity 5.6.3p2, a version number that is now burned into the minds of Mekanimator’s developers. Initially, we aimed to keep up with new version releases, as they occasionally addressed issues we had encountered, such as crashes when using a certain component or bugs with GameObject instantiation methods. But a side effect of each version update was a tendency for Unity to reimport all the game’s assets—scripts, plugins, models, sounds—which would always wreak minor havoc on the project’s metadata files, the git repository, and the other developers every time it occurred. After a number of these upgrade-commit-reimport episodes, we begrudgingly unchecked the “check for updates” option in Unity and settled in for the long haul.
Along with this version lock-in came other decisions to help form a united front with (and maybe against) Unity. We established that the Unity engine and all our external components would target Microsoft .NET Framework 3.5 for the sake of component compatibility. If we wrote code for a dynamically loaded library (DLL) that we wanted Unity to import, and if this library contained features from a newer version of .NET, the code might fail to work properly in-game. Without oversight, such issues can rear their ugly heads well after core features have been implemented using tech standards that are only supported on one half of the system. Setting specific versions for Unity and the .NET Framework headed off many of these issues before they could begin.
By now we had effectively determined the major technical constraints that would define the boundaries of our work, attentive to the shaping force of platforms, programming languages, and operating systems. In summary, we were looking at Unity 5.6.3p2 for the engine side of Mekanimator, C# and .NET 3.5 for both the Unity components and the external processes, and Windows 7 and above for the operating system. We anticipated supporting other platforms down the line, thanks to the cross-compilation features in Unity and growing support for .NET on other operating systems. For motion capture, we decided on the Microsoft Kinect for Windows 2, or Kinect v2, after initially prototyping with the original Kinect, or Kinect v1, for reasons that are elaborated further in the next act. There was still a lot of planning work to do in deciding an overall software architecture, including meticulous consideration of the licensing details of any third-party components that could affect our ability to release Mekanimator as a free and open-source machinima tool and to publish Play the Knave.[4] But we had figured out the major constraints as a means of knowing what not to do, which goes a long way in software engineering.
“Chief architect and plotter of these woes” | Mekanimator’s Architecture
In Shakespeare’s gruesome tragedy Titus Andronicus, although Tamora is a critical agent in developing the bloody revenge plot, her lover Aaron is called out as the “chief architect and plotter of these woes” (5.2.123), responsible for the twists and turns of a complex scheme with many moving pieces. Aaron is not so unlike today’s software developers, also termed architects. In software, architecture refers to the general guidelines, paradigms, and practices that aim to unify a complex software system. Akin to a blueprint, a project’s architecture gives guidance to developers working independently so the resulting components can be used together effectively, while minimizing the efforts needed to do so, thanks to good design and agreed-upon standards. What would Tamora be as an executor of gruesome deeds without Aaron having developed his sound architecture? Like the dalliances in the forest between Tamora and Aaron, the ModLab meetings that generated the project requirements for Mekanimator drafted the outlines of its architecture. By the end of the major planning meetings in 2014, we had a complete design document for the project with a clear message to guide construction:
Play the Knave and the underlying platform, Mekanimator, are architected from the start to be extensible and future-proof, to foster a community of participants, and to minimize the distinction between a participant and a developer as much as possible.
To be more specific, Mekanimator is a platform for digital performance, with Play the Knave regarded as a module of specific assets. The main features of Mekanimator include:
- Real-time animation driven by live motion capture, hosted externally
- A karaoke-style text system to indicate the timing, cast member, and directions for each line in a scene being performed
- Support for a massive library of scenes curated for play, and for running custom scenes
- A tool for writing and testing custom scenes
- A wide variety of avatars for various themes
- A recording system to capture video, audio, movement, and scene data for each performance
- An upload system to log performances on a server
- A way to share uploaded performances via links sent by email
All in all, the list of Mekanimator’s roles and responsibilities is rather comprehensive. Once we enumerated these functions, it became clear just how much effort would be required to successfully make Mekanimator. The architecture for such a project required strong direction and vision, which was shouldered largely by Buswell. His talents and industry experience with large codebases would prove to be invaluable in orchestrating such an undertaking. Buswell also has the distinction of making the Mekanimator git repository’s first official commit on Tuesday, March 25, 2014, at 3:16 PM Pacific Time.
It felt daunting to plan the development of the Mekanimator platform with support for all the intended features in time for the first major event: the 2015 Stratford Festival in Ontario, Canada. To handle the anticipated workload, we looked at the platform’s features as individual problems, each with well-defined inputs and outputs. Despite working in a Microsoft-based environment, we took plenty of inspiration from the Unix philosophy for modular software: “Write programs that do one thing and do it well. Write programs to work together. Write programs to handle text streams, because that is a universal interface.”[5] These guidelines capture the spirit of modular software design. The modular approach holds that a collection of largely independent tools can constitute a platform with greater powers of reusability and flexibility than those of monolithic software. Although a singular, monolithic program can provide all the necessary functionality, it cannot easily be reinvented and repurposed without serious efforts to modify or decouple intrinsic behaviors. We knew that modularity and modifiability were going to be crucial to our project.
Because we decided from the start to reuse rather than reinvent software, once we began programming Mekanimator we already had several pieces of functionality available: the Kinect camera and its software libraries, the video-encoding software, and the Unity game engine, which we conceptually dissected into its specific abilities, such as adding an object to a scene or animating an avatar. We envisioned these pieces as either data “sources” or “sinks”: places from which we could get information, such as the Kinect camera and its speaker, or places to which we could send information, such as the audio playback interface. The task of Mekanimator was then reduced to setting up a web of connections between these objects. With different connections, Mekanimator would do different things. It could play back recorded data, use the Kinect, load a particular background, and so forth, depending on how these reusable modules were connected. This web of connections could be defined in files and changed with menus, shifting the effort from coding the core software to developing configuration files and commands for that core software. In turn, this configuration system deeply affected the social organization of Play the Knave, enabling the script and scene contributions of our undergraduate interns, among other things. As we elaborate below, developing the configuration system required a lot of effort, and while we stand by this approach, we may not have always struck the right balance between code and configuration.
Our initial programming task was to figure out the best way to encapsulate the already existing software and organize it into modules that could talk to each other according to a specific configuration. For instance, we expected that options for motion tracking would change over time, and we wanted to be prepared for the possibility of online multiplayer support; we therefore pursued a software design in Mekanimator that utilizes a network protocol to receive movement data from another process instead of directly connecting to the Kinect sensor in Unity. Furthermore, we recognized that, regardless of the movement data’s source—whether a Kinect v1, a Kinect v2, a prerecorded file, or an alternate solver—Mekanimator could be written to expect only one format as movement-data input. Thus, to handle this responsibility, we developed an external program called KinectDaemon, which was written in C# with Microsoft .NET 3.5 and the Microsoft Kinect Software Development Kit (SDK). To bridge the connection between KinectDaemon and Mekanimator, Buswell developed a network protocol to be used by both processes: Simple Stream Control Protocol (SSCP). This protocol and the C# library in which it is implemented provide functionality for hosting a server, connecting as a client, and transmitting and receiving messages encoded in JSON (JavaScript Object Notation) to support serialization. It utilizes the System.Net.Socket class from the .NET framework for the client and server connections, and it transmits messages with UDP (user datagram protocol), a popular choice for networking in games because it prioritizes speed over message-delivery reliability. In our usage, KinectDaemon hosts an instance of SSCP’s Server class and Mekanimator connects using the library’s Client class.
The name “KinectDaemon” is somewhat recursive. The program is written to execute as an external process, launched by Mekanimator when a scene begins, and serve movement data from a source (whether a Kinect v2 sensor or a prerecorded file) to connected clients. Internally, KinectDaemon is designed to dynamically load an appropriate library for whichever configuration is requested by the host process via a command-line switch. Mekanimator supplies this information based on the game settings and scene configuration. For example, Mekanimator can start the process KinectDaemon.exe with the argument “/v 2” to specify that it should load the Kinect v2 library. We wrote KinectDaemon libraries for Kinect v1 and Kinect v2 devices, as well as file libraries to replay movement data recorded by KinectDaemon from a previous session. We planned this component such that KinectDaemon could be extended to load more libraries for alternative body tracking solutions, such as OpenNI, OpenPose, VNect, and Orbbec devices, but the support for Kinect v2 devices has remained the longest-running option. There is more to share regarding motion capture in Mekanimator, which can be found in Act IV. For now, this excerpt can be appreciated as a practical application of the modular design principles that echo throughout the platform.
Modular design philosophy requires coordination to ensure that independent libraries and components work properly together; at the same time, it empowers developers by treating them as authorities on their individual subjects, fostering a sense of ownership and responsibility for the programs one creates. The constraints of software engineering are also in play with modular design: given the amount of work to complete and the time allotted, what is the most efficient way to distribute the labor? One cannot wait for every single feature to be completely designed, implemented, and tested before integrating its behavior into the overall platform. Effective compartmentalization of Play the Knave’s functionality into separate processes allowed room for extremely rapid iterations of individual features of the platform.
Thus began the divide-and-conquer approach to satisfying the functional requirements of Mekanimator. On the issues of motion capture, avatar management, and animation with the Kinect hardware, the next act provides an in-depth look at the problems and solutions we faced. But for all the components, we had to establish which aspects would be handled within the Unity engine, and which aspects would be handled outside of it, with the complete solution depending on both sides working properly. Discussion of these components falls into the following categories:
- Text, karaoke, and scene management
- User interface and APIs
- Recording performances and post-processing
- Uploading and server-side management
- Building and distributing the game
“Words, words, words” | Textual Development
While a scene is running, Mekanimator’s primary tasks are to continuously serve text to the players and track their body movements using avatars. In this section, we discuss the first task in more detail, looking at the technical aspects of the text-based elements in the platform to better understand the collaborative bonds between data and code, user and developer, and author and performer. At the Unity level, we utilized screen-space GUIText components to display the lines for players, but there is a long journey between the source material and the screen. To start: timing information is needed for each line in a scene to provide proper pacing. Convention, simplicity, and ubiquity led us toward using SubRip Text files (.srt) and formatting for this purpose. As a plaintext format, SRT is extremely simple, with each entry in a file separated by two sequential newline characters (\n) and following the format:
StartTime –> EndTime (both formatted as hh:MM:ss,mmm)
TextToDisplay (the content to display for this entry)
Mekanimator can parse the content of such a file and, when the scene begins, change the GUIText component such that it displays the correct line at the appropriate time intervals. Such .srt files can also be loaded in media playback software such as VLC, which provided a helpful method of verification and testing during early development. Because SRT is so easy to understand, we began prototyping the game’s initial scenes using plaintext editors, manually plugging in timing values and pulling in Shakespeare lines from the Folger Shakespeare Library’s digital text collection.[6] However, as mentioned in Act II, this approach quickly ran its course due to the tedious and often erroneous nature of adjusting SRT timing values by hand. Consider if, when working on a scene with 20 lines, the editor or scriptwriter wishes to retime the tenth line by shaving off 1 second. Unless they properly time-shift the other lines (removing 1 second from the start and end times for lines 11–20), there will be a noticeable gap after the tenth line and the total scene length will remain the same. A similar problem occurs when adding or removing a line, in the same vein of inserting or removing elements in the middle of contiguous memory in a programming language with unmanaged memory. The fact that this kind of issue must be addressed when editing a scene file is not, by itself, a serious issue—software handles such tasks all the time—but having humans do so by hand is an extremely easy way to introduce new problems. For a short while, we directed scene authors to use tools such as Jubler for retiming tasks. When used properly, the software addressed the problem with time shift; but correct usage of the tool was a recurring problem. Additionally, the TextToDisplay in each scene started off with a simple format, containing just the character’s name and line:
00:02:36,980 –> 00:02:41,020
Oberon: Wake when some vile thing is near.
This format rapidly evolved to include additional content, relying on basic HTML tags that could be parsed into Unity’s rich-text formatting syntax, which allowed us to add color, spacing, and text decoration to display the scene’s text more effectively. We found that players benefited from having color-line coordination to recognize their cues more quickly. Some lines called for additional spacing concerns, such as line breaks. We also wanted to differentiate between character names and scripted lines for the purposes of karaoke-text highlighting, which will be discussed later. Soon, the SRT parser in Mekanimator came to expect lines in the following format:
00:02:36,980 –> 00:02:41,020
<p name=”Oberon”>
<span style=”color: #729fcf;”>
Oberon:<br/>
<br/><p>Wake when some vile thing is near.</p><br/></span>
</p>
Putting aside the non-standard tag usage,[7] this formatting was intended to be convertible to Rich Text in Unity, which “is inspired by HTML but isn’t intended to be strictly compatible with standard HTML.”[8] When the SRT file for a scene is displayed as an HTML file, these tags also help create a quick, printer-friendly reference for situations where hard copies may be helpful.
The next evolutionary stage in the text format relates to a desired feature revealed during testing. Players appreciated a preview of the upcoming line to help understand when to switch speaking roles. So, as part of our text format, each line also included the text to display for the next line:
00:02:22,000 –> 00:02:36,980
<p name=”Oberon”>
<span style=”color: #729fcf;”>
Oberon:<br/>
<br/><p>Be it ounce, or cat, or bear, pard, or boar with bristled hair, in thy eye that shall appear when thou wak’st, it is thy dear. …</p><br/></span>
</p>
<p class=”next”>
Oberon:<br/>
<br/><p>Wake when some vile thing is near.</p><br/></p>
Such tags are a bit redundant to include in the SRT file since the next line can be derived from the entry immediately after the current one. But we anticipated this feature possibly being used for other purposes, such as providing stage directions for the upcoming line. So, we decided to specify the information directly in the .srt files, rather than change the SRT parser to auto-generate the next line and thereby prematurely lock this feature to a single purpose. In effect, we placed the responsibility of implementation on the data rather than the software. As one can imagine, writing such scene files by hand is rife with pitfalls. Missing or mismatched tags, extra newlines, incorrect character labels, omitted “next” entries, botched copy-paste jobs, and curly quotes copied from rich-text office-productivity applications in place of straight quotes are just some of the errors we encountered that prevented text from being parsed and displayed properly in Unity.
We also needed to support multiple speeds for each scene, allowing the same text to be presented at slow, medium, and fast preset speeds. Moreover, we wished to offer both abridged and full-text versions of each scene, with three speed options apiece, creating a total of six file variations for each available scene. Our internal organization scheme for these scene variations involved providing a number suffix, and we arranged scene files in the game’s “Resources” folder by using a folder-based hierarchy in the following pattern:
Name of Play/[1-4] Player/Name of Scene – [1-6].txt
For the last number in the path, 1, 2, and 3 indicate abridged difficulty levels of slow, medium, and fast, and 4, 5, and 6 indicate full-text difficulty at the same respective speeds.
The scene .txt files contain the lines formatted in SRT fashion, as previously described. As before, manual authoring of the scenes across multiple speeds was problematic. As the number of scene authors grew, more and more time would be required by our development team to import, test, correct, and backport changes to the scene files. In turn, experienced scene editors needed to spend more time self-correcting—if a text error was discovered in one difficulty/speed version of a scene, every other version would need to be checked, corrected, and redistributed through our scene repository. Although we were glad to see the number of scenes grow in Play the Knave, we were collectively frustrated with the process.
The solution was to effectively silo the production of scenes, reducing room for human error and streamlining tasks related to time-shift and multiple speeds. Enter the first version of Mekanimator Scriptmaker. Released in February 2016, Scriptmaker v1 was developed as a client-side web tool, powered by JavaScript and jQuery. The introduction of Scriptmaker enabled anyone with a browser and internet access to work on scenes, whereas the previous process required our scriptwriters to have a Windows PC capable of running Play the Knave. Before this, the quickest way for a scriptwriter to check their work was to save their file as “Test.txt” in the game’s root directory. Because Unity would compile the finalized scripts in the game’s “Resources” folder into a single resources file (along with other assets such as audio, avatars, and stage models), it was complicated to load an edited scene file without having a copy of the Mekanimator repository and an instance of the Unity engine to run in edit mode. For context, the ModLab possessed two professional licenses for working on the game in Unity 5 (one for each of Mekanimator’s core developers), but the scriptwriting team was 47 strong by the time we settled on the full set of Shakespeare scenes to include in Play the Knave. As a workaround, we added a hardcoded path in the game and a button in the user interface that would load the SRT content from the “Test.txt” file in the directory, allowing scriptwriters to test their scene without a full iteration of the build-and-release process. Of course, this scene-testing method was also prone to human error, most often the result of scriptwriters misnaming the file “Text.txt” or saving the file in the wrong folder. The Scriptmaker tool helped us to ensure consistent authoring of game scenes.
In Scriptmaker v1, authoring a scene produces a JSON file. The JSON file structures the scene’s contents into named properties, including:
- scene info (name, description, source, author/editor, themes/tags)
- cast listings, where each cast member is assigned a color
- a list of available speed options
- lines to perform, with each one having a duration, timing offset, and content
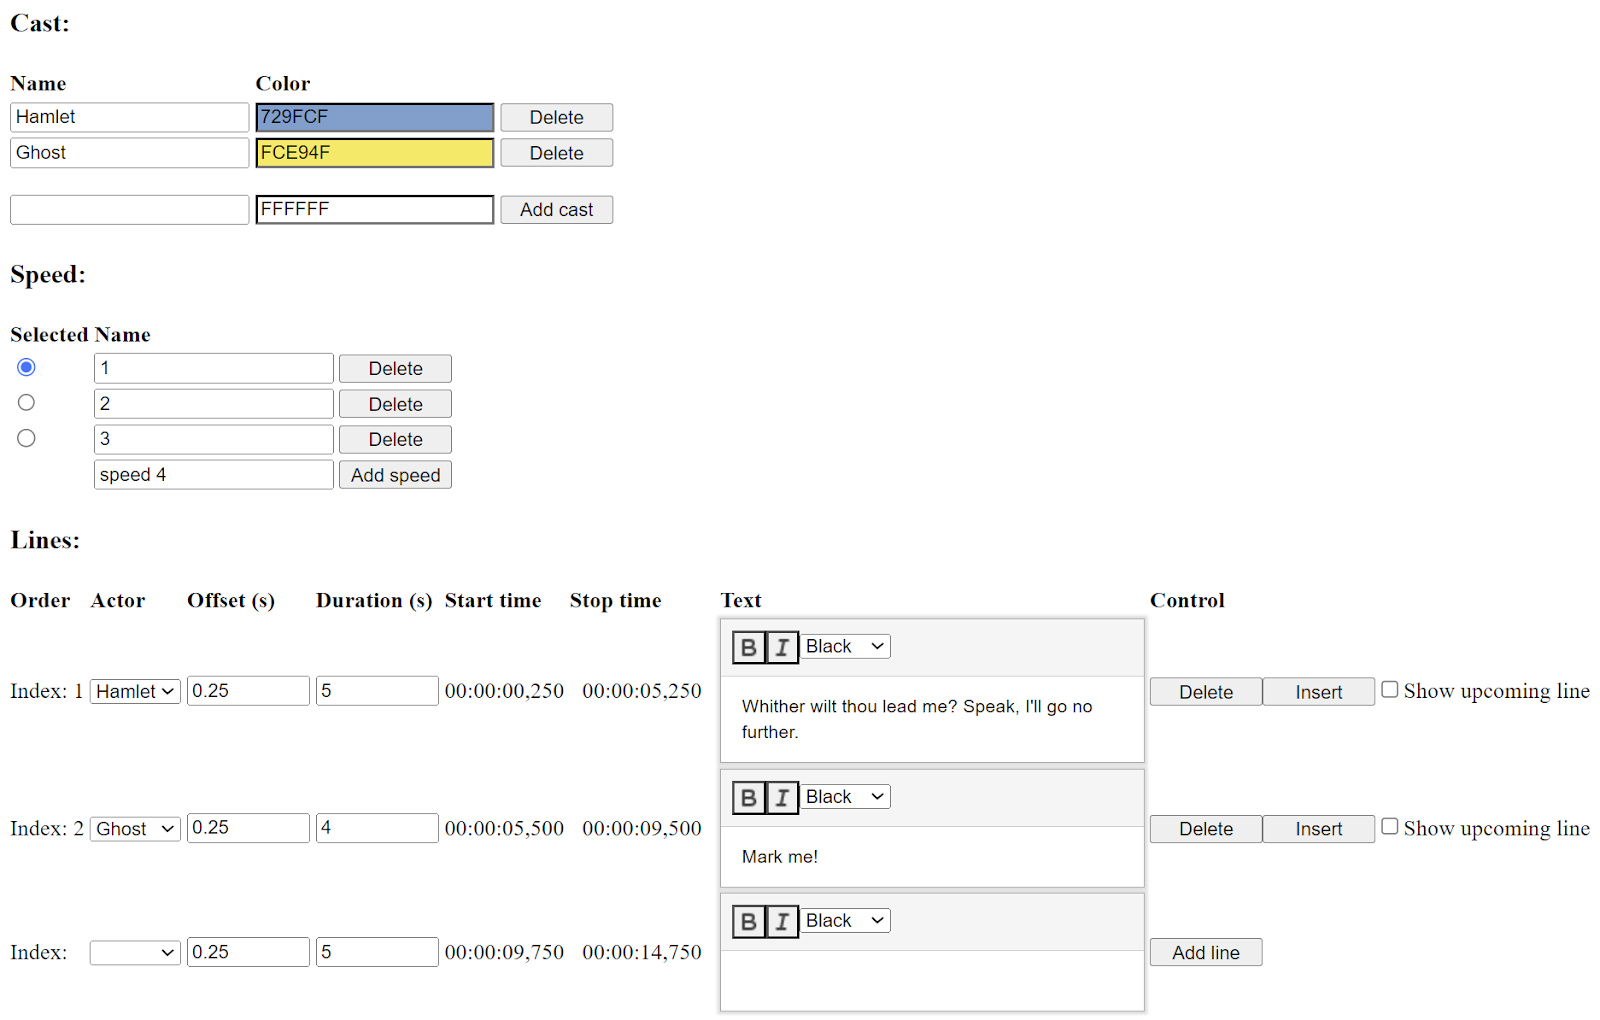
The image to the left shows the user interface for Scriptmaker v1. When a scriptwriter edits a scene, the interface updates in real time, automatically reflecting changes to timing, cast, and text. Importantly, changes to timing are restricted to duration and offset values (measured in seconds) for each line. Setting these values instantly recalculates the SRT timestamps to be exported, which are then displayed in the accompanying columns. Changing the selected speed preserves the content of each line but allows changes to the line durations and offsets that are unique to that speed. The names of these speeds coincide with the numbered suffix that Mekanimator expects to encounter. Ultimately, this means that each scene is authored over two JSON files: one for the abridged content (with speeds 1, 2, and 3), and one for the full-text content (with speeds 4, 5, and 6). Scriptmaker can save and load a JSON file to support persistent edits for a scene. There is also a testing button that will run through the scene’s lines using the currently selected speed. When a scene has been finalized, the author can export automatically generated SRT files for each speed. Thus, editing a scene’s contents can be reduced to editing the appropriate JSON file.
Using this tool dramatically improved the scene-authoring process across the board. Line contents, cast assignments, and formatting were now always consistent. Parsing errors were reduced to bugs in Scriptmaker, which we could then quickly identify and fix. Content errors were easy to correct. Authors no longer had to maintain changes manually across the six SRT versions of each scene. For the purposes of authoring scenes for Play the Knave, this first version of Scriptmaker became an indispensable tool.
However, because the Mekanimator platform was also intended to support custom performance scripts and original machinima creations, we wanted a more elegant way for authors to develop new custom scripts that did not require manually editing a magic “Test.txt” file in the game’s directory. This led to two important developments: a revision of Scriptmaker for public use, and an overhaul in how the game handles scene loading and user-interface controls.
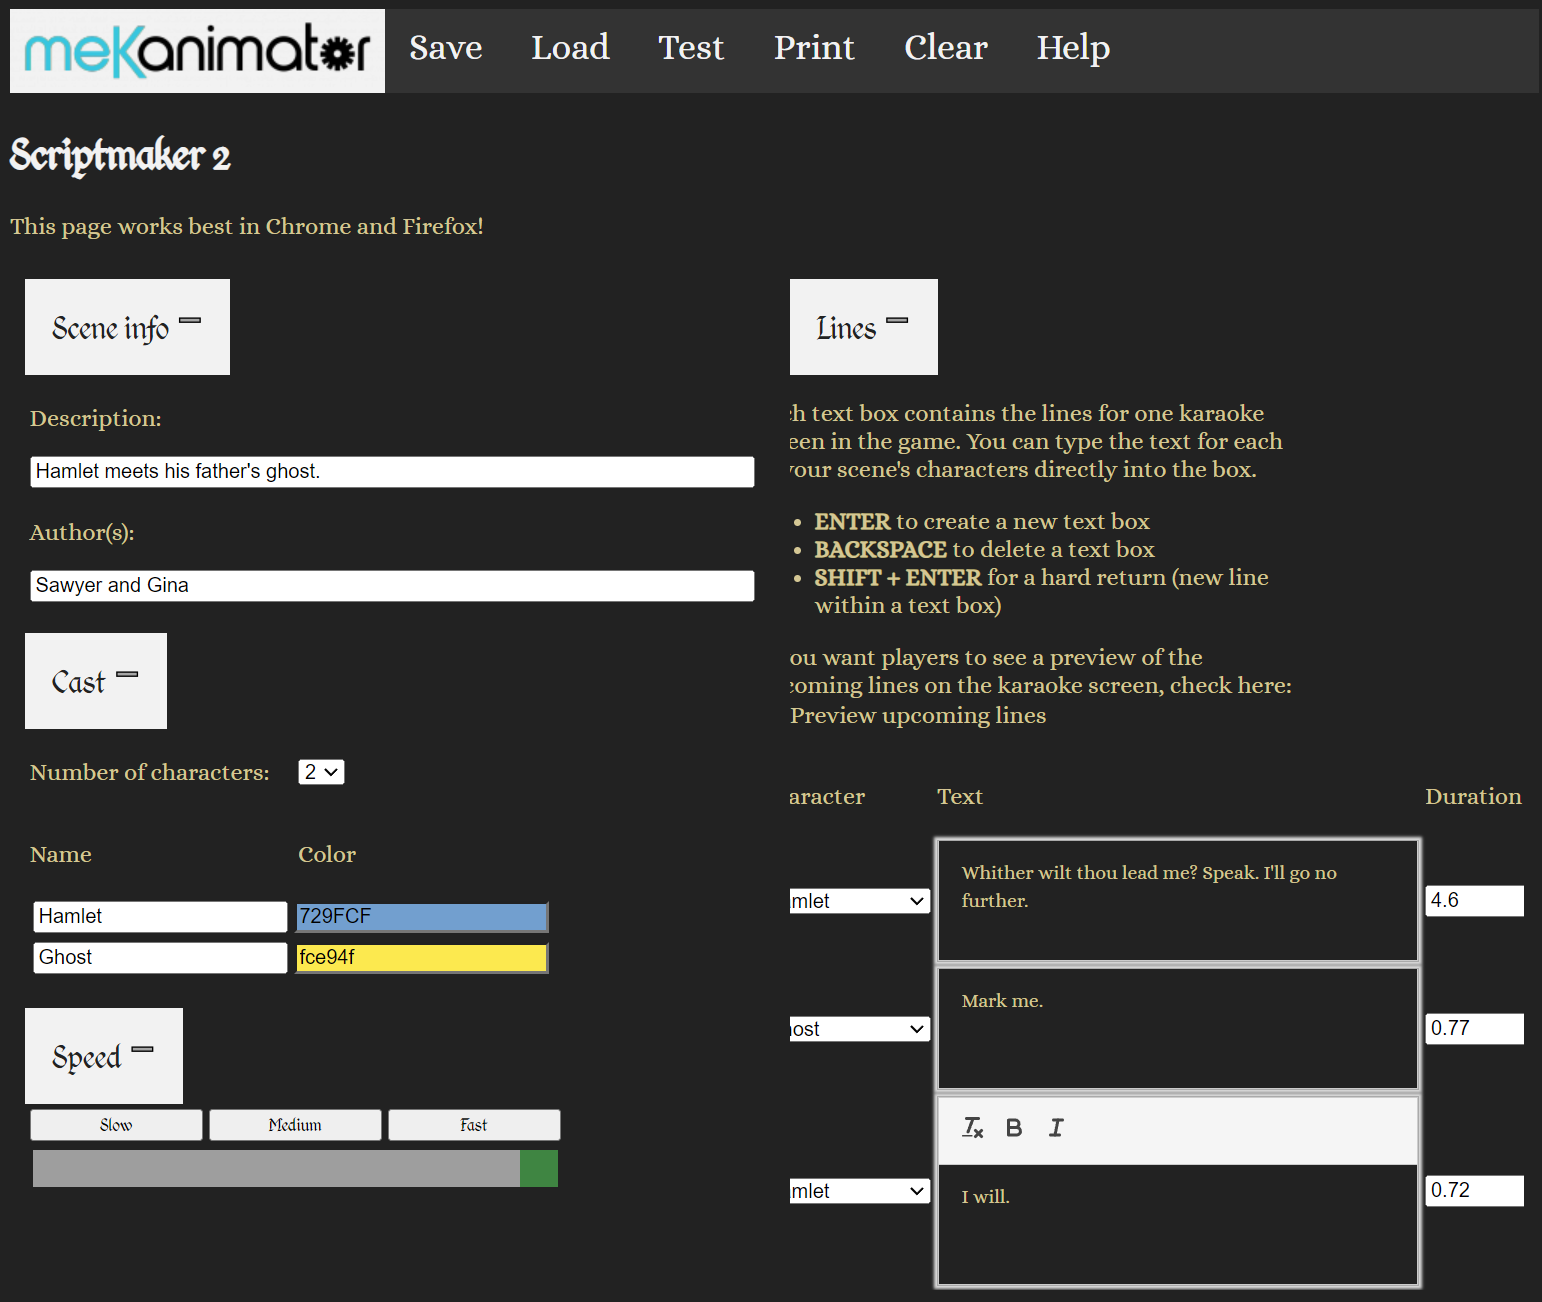
The original Scriptmaker v1 tool had no frills. For our team of in-house scene editors, it was suitable enough. But we wanted to streamline the appearance, controls, and instructions for broader public use. We released the revised version, Scriptmaker v2, in May 2018. This version of Scriptmaker uses many of the same internal features as the original Scriptmaker v1, but with several notable modifications. First, we changed how line speed is handled. Every time a line is added or changed, Scriptmaker v2 provides an estimate for the line’s duration based on the word and character counts. These estimates are multiplied by increasing factors for slow, medium, and fast presets, and then interpolated into a continuous, adjustable slider. Although the estimator runs automatically for new lines and the slider adjusts all lines globally, script authors are still free to manually set the time for each line using the interface. Additionally, they can use the “Time” option, which displays the lines one at a time and automatically advances through the lines with a button press, setting the duration based on how much time has elapsed since the previous line was displayed. Our intent was to offer a range of comfortable controls for script authors to suit different editing preferences and to support creative visions of how scenes should be performed.
Next, we modified the save/load feature to resolve the differences in how the original Scriptmaker v1 used JSON for persistence and SRT for exports. The result was a combination format we labeled JSRT (JSON + SRT). A .jsrt file is a plaintext format that begins with JSON data, which contains all the information needed to save and load the scene in the tool, followed by the SRT data exactly as it would appear in export mode. With the JSRT combination format, we could keep the scene contents consistent and also have the appropriate format ready for different contexts. For example, Mekanimator can parse only the SRT content and ignore everything JSON-related by traversing the file from the initial { symbol that denotes the start of JSON content until the last enclosing } symbol. Conversely, Scriptmaker can parse only the JSON content and ignore the SRT content, which is automatically generated by Scriptmaker when the file is saved.
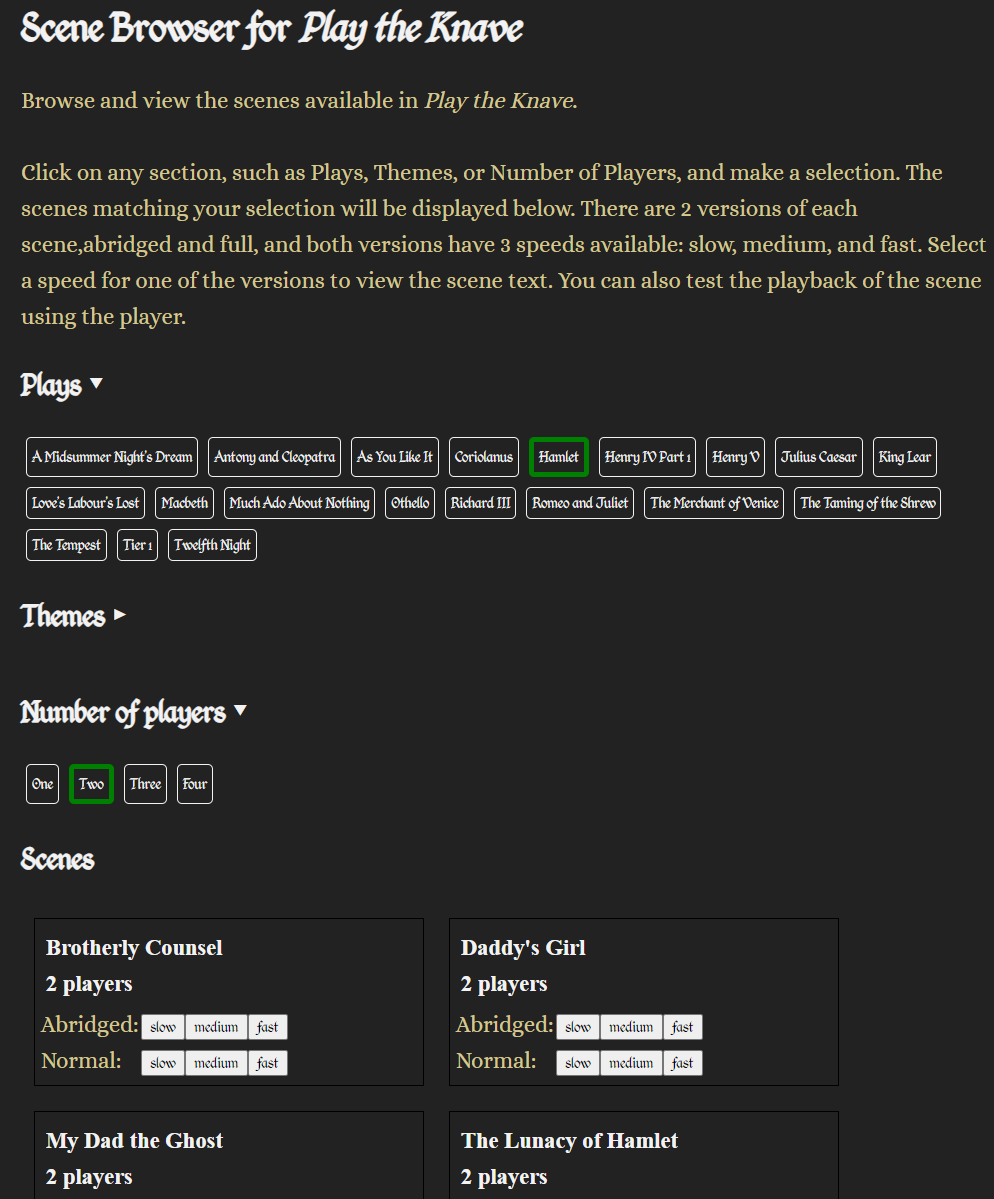
Scriptmaker v3 appeared in June 2023, with additional functionalities for browsing and importing Shakespeare scenes originally created for Play the Knave. To implement this feature, we collated the metadata for each Shakespeare scene into an SQLite3 database file and wrote a small API in PHP to handle queries submitted via web requests. The interface for the Scriptmaker scene browser is completely data-driven, creating buttons and menu selections based on the database content. For example, the front-end can request a list of two-player scenes in Hamlet, and the API will respond with a list of matching scene names and descriptions (see below). The user can then load a scene directly into Scriptmaker, revise it however they like, and save a local copy as a JSRT file for their own use in Play the Knave—whether for solemn scholarly purposes or for creating playful mashups, parodies, or imaginative reboots. (Antony and Cleopatra and Zombies, anyone?)
“Which holds not color with the time” | Warming up for Karaoke
When writing a scene in Scriptmaker, the author must take care to choose line durations that fit the overall pacing of the scene with respect to the assigned difficulty and speed level. By either auto-timing lines based on character and word counts, measuring duration using the “Time” tool, or manually setting the lines, the author has enough control to define and revise timing data until the scene’s ideal flow has been found. As mentioned, the SRT data output from this process provides start and end times for each line, which are derived by iterating over the lines during export, accumulating the durations of each line and adding a small offset (0.25 seconds) after each line, during which no text appears. This offset was chosen to provide a brief but helpful visual cue for players to preserve the overall rhythm of the scene while aiding in the verbal handoff from one player to another.
Before a selected scene can begin playing, Mekanimator parses the scene’s input SRT data to prepare SRTStream objects (text source datatypes with unique names) so that GUITextSink objects (text sink datatypes listening for input under these names) can receive and display the appropriate text for the right duration at the right time. To show SRT text on the screen, a sink requires a Unity GUIText component. Then, as the Update() functions are repeatedly called by the Unity engine, an SRTStream object can use the elapsed time from the scene’s start to decide when to update the current line using the SRT timestamp data. In the SRT parsing process, Mekanimator splits each line into two parts, which are then collated into different SRTStream sources: the current text to display, named “subtitles,” and the preview of the following line, named “next.” Splitting the text content into these separate sources and sinks allows us to control the display properties of each more easily. We emphasize the current line with larger text and brighter colors at the top of the screen, while the preview line is smaller and displayed in gray underneath the current line. The presence of a preview line helps players understand whether they are expected to continue performing from one line to the next, or when another player will be taking over. When configuring these display components, we tried to balance the available screen space between lines and player avatars. We check for line length and account for word wrapping in the case of especially long lines, but this results in the text display occupying more space. If a line is too long, it overlays the screen area meant for avatar visibility. To account for this, we instructed our team of scriptwriters to aim for two vertical spaces per script line. If a display device has a peculiar need, the font sizes for both sinks can also be changed in the game’s settings.
We realized that it would be disorienting for players to launch into a scene immediately at startup. The game therefore provides a 10-second countdown so that players may get into position before it invokes an API call to load the selected scene. In addition, it offers players the option of doing a “warm-up” sequence before the actual scene begins. The warm-up sequence presents some brief tutorial exercises that help players get acquainted with the play space, acquire their avatars, and practice making movements. Internally, this means that the true beginning of a scene—the temporal origin for the scene’s text display, and the moment when playback and recording events should start—is delayed by the length of the warm-up. To account for this process, we developed a SRTCompositor class that can load, time-shift, and merge multiple SRT data sources together and provide a finalized version of the SRT data as an SRTStream. With this tool, the warm-up text is dynamically constructed from a set of templated SRT files, which are chosen based on the players’ warm-up selection and the scene’s number of players. The warm-up text identifies the scene’s cast members (substituting actual character names for placeholders like “%character_1%” in the underlying SRT template), thus helping players to associate each character with a particular text color and a selected avatar prior to the scene’s start.
As we developed and tested the SRT-driven text display components, we began to appreciate the importance of visual cues. Further iterations led us to develop the line-preview feature, but we still needed an intuitive way to inform players of how much time they had to perform each line. As mentioned in the previous act, we experimented with a few widgets to find the right balance. One prototype involved a horizontal progress bar showing the line’s duration, but this scheme quickly revealed the dilemma of cognitive overload. It is too demanding to ask a player to pay attention to their avatar, recite lines of Shakespearean English, and keep track of a timer widget all at once. We had similar issues with a radial timer that gradually filled and changed color, and a numerical timer that counted down to zero. None of these visual displays fully met the players’ need for easy feedback when attempting to pace their performances. We ultimately landed on a process that modifies the display of the GUIText components in the manner of a karaoke machine, progressively coloring the text to indicate the elapsed time and suggest the overall duration. This solution seemed a good fit for most players, as it eliminated the need to look away from the Shakespeare script to check a timer elsewhere on screen, leveraging instead the attention already being paid to the current line.
With karaoke in mind, we next had to choose the exact manner of text coloring. As Unity’s Text components support rich-text formatting using tags similar to HTML, progressive text coloring is a matter of the sink components applying the right tags at the right time. Timing is handled rather easily, as Mekanimator constantly knows the current time, the time when a line has started, and the time when it has ended. It is common practice in animation to map an input value into the interval of [0, 1] as this directly represents the percentage of an effect to apply. In our case, a value of 0 would indicate that a line has just begun, 0.5 would indicate that the line is halfway complete, and 1 would indicate that the line is complete. We can parameterize elapsed time t for a line as (currentTime – startTime) / (endTime – startTime). With this, we know how much of the line should be colored at any given moment. For instance, if a line has 160 characters and t is currently 0.76, the first 122 (121.6 rounded) characters should be highlighted. Alternatively, if a line has 30 words and t is currently 0.76, then 23 (22.8 rounded) words should be highlighted. In either case, once a line appears on the screen, t is always increasing from 0 to 1 until the line is finished, and then a new line is delivered and the process repeats. We should acknowledge that this process treats all characters or words equally: the mapping of time to line progress is linear, unlike karaoke systems for songs that have varying speeds to help emphasize a performance’s style and rhythm. This does not mean that Mekanimator expects players to perform their lines at a constant tempo; performers are free to deliver lines in whatever style they deem fit, as long as they finish doing so at or before the line’s conclusion.
The next challenge involved applying formatting tags to generate the karaoke-style progressive text coloring. Ignoring the “next line” preview, recall that the structure of the TextToDisplay component for a line in an SRT file is as follows:
<span style=”color: #729fcf;”>
Oberon:<br/>
<br/><p>Wake when some vile thing is near.</p><br/></span>
</p>
The first <p> element indicates the assigned cast member—in this case, Oberon. The <span> element that follows provides the color coordination for this cast member. After that is a visual label for the assigned cast member with a colon and line breaks. Then, finally, the text to perform is given in the innermost <p> element. For karaoke text, we only wish to account for the visible characters inside this element. The cast label and all formatting tags should not be included in this estimate. Excluding spaces, there are 112 characters in the total line,[9] but only 28 characters should count for the karaoke text-coloring process. That is, when we compute t using the timing data, t*28 characters will be highlighted at any given value of t in [0, 1].
When the SRTStream source reports a new line to the GUIText sink, the new line’s text passes through a filtering process. This process identifies the visible characters that will be highlighted for karaoke and tracks their numerical position inside the text. The filter’s output gives us an array of visible characters along with an array of positions of these characters in the original text. We can then use these positions to continuously rebuild the display text and insert color-formatting tags at the appropriate position as determined by the timing data. When a line begins, the entire line is displayed using the cast member’s color. Then, an opening color tag for white is inserted just after the cast member’s name, followed by a closing color tag. During the line’s allotted timeslot, we recreate the text to display with the insert closing color tag at the text position associated with the timing value t. This process is repeated during Mekanimator’s update loop, so the players perceive a gradual change in color that gives a clear indication of the time elapsed and remaining.
Karaoke-style highlighting for text that already contains formatting tags, such as <b></b> for bold and <i></i> for italics, is more involved. The same process applies, but as the coloring progresses, we must pay attention to see if any of the already highlighted characters were embedded inside formatting tags. To properly highlight such characters, we must introduce temporary closing and opening tags of the same formatting style; otherwise, the inserted closing color tag will not be properly parsed, resulting in the formatting text incorrectly leaking into the display. In effect, this splits a single <i></i> tag and its interior text content into two parts: the section that has already been colored, and the section that remains to be colored. A visualization of this process can be seen during Rosalind’s first line in the video above.
At the time, Unity’s support for GUIText components made this process the most practical way to deliver text to the players and highlight it accordingly. But this process is sensitive to the input text’s formatting and depends on matching tags. For example, a line like the following
<b><i>that contains text formatted with mismatched opening and closing tags</b></i>
yields HTML that web browsers can usually parse and display as expected; but Unity will simply display the tag as written, because the tags (with </b> before </i>, even though <i> is the closest opening tag) cannot be properly matched and are disregarded for text formatting. For these reasons, we enforce strict rules for rich-text formatting in Scriptmaker, allowing only bold and italic emphases, and requiring proper nesting of the formatting tags if both are active on the same text.
The character-by-character coloring process we developed was born out of necessity. It provides finer-grained timing feedback than highlighting entire words would, and it allows players to gauge their speed while reading the text. But there is a certain feature missing that is commonly seen in karaoke machines: seamless color changes within each character. This is merely a visual effect, but the use of Unity GUIText components with a tag-driven highlighting system makes it infeasible for Mekanimator to provide—at least, within the limits of Unity 5. However, more recent versions of the engine introduce TextMeshPro (TMP) as a replacement for the legacy Text components. With TMP, developers have access to the graphics shaders (programs that run on graphics hardware to render data) and mesh data generated for a line. Together, these elements provide enough data to implement smooth character fill. In addition to supporting this flavor of eye candy, it also divorces the karaoke-style highlighting process from the text’s formatting, making both features much simpler to support. The reason for this is that TMP automatically generates and assigns appropriate mesh and texture data for all characters in a line of text, regardless of how they are formatted. That is, each visible character is displayed using a quad (a planar mesh of 4 vertices) for placement and a texture (a font image containing all characters and variations for the chosen font) with the necessary coordinates for size, placement, character, and style automatically determined by the component and the selected font asset. In short, TMP creates different mesh and texture values to draw the same character when formatted as a regular value, a bolded value, an italicized value, or a bolded italicized value.
For smooth color changes across a line of text, we can augment the shaders used by TMP and supply additional timing data for the current line. We still compute t just as before to determine which character represents the threshold between karaoke-highlighted text and normal text, but we take it one step further and compute an additional parameterized value c in [0, 1] each time the character position designated by t changes. Given the line’s duration d and the number of visible characters n, each character should spend d/n seconds being highlighted. To illustrate, a line may have a duration of 10 seconds with 40 displayable characters. During its display, t will gradually change from 0 to 1 over 10 seconds, but c will increase from 0 to 1 over 0.25 seconds, 40 times in a row. By utilizing parameterizations of elapsed time for the line (t) and for the current character (c) in the line as determined by t, we can rewrite the vertex shader—which controls the placement of the character on the screen—to calculate whether the character associated with its mesh has not yet been highlighted, is currently being highlighted, or is about to be highlighted. Then, the fragment shader—which controls the coloring of the pixels contained by the character’s quad—uses the current value of c to determine the fraction of the character’s surface to color, going from left to right (see video below). Using both methods at once, smooth karaoke highlighting with rich-text formatting is relatively achievable in later versions of Unity that support TextMeshPro. In fact, it will be a feature of the forthcoming VR edition of Play the Knave, which is currently under development. But, for now, this solution for smooth coloring in sync with the timing data is like Bertram’s course of action in All’s Well that Ends Well, a plan “which holds not color with the time” (2.5.63). It is a puzzle for the future, a colorful scheme for a later time.
“Gape and point at your industrious scenes” | Mekanimator’s Metadata
Behind the scenes, there are yet other scenes. In Unity, a “scene” typically refers to a configuration of game objects and components that constitute an environment for the editor to run. Games made in Unity can utilize multiple scenes for different purposes and switch between them as needed based on various interactions. For instance, a game might define one scene with only UI components as the startup scene to represent the main menu. Selecting a game mode from this menu would then load another scene based on the choice. Mekanimator, however, does not utilize multiple scene files in the way that is customary to Unity. Instead, it loads a single Unity scene that contains all the necessary components for loading and running Mekanimator scenes.
In Mekanimator, “scenes” refer to JSON files that contain the runtime parameters needed to load an SRT file for karaoke text, player avatars, a stage with its lights and camera, and an optional background audio selection. There are over 200 such scenes available in Play the Knave, which helps explain our choice to define them as JSON scene files rather than as Unity scenes, as making and accessing such a collection of scenes natively in Unity would take a colossal amount of effort and severely limit Mekanimator’s powers of collaboration; creating a new scene for Mekanimator should not require the use of Unity itself or the need to rebuild the Unity project’s executables. As the details of Mekanimator’s scenes are more compelling to the story of the platform’s architecture, this will be the focus of discussion. However, we will save a description of the primary Unity scene in Mekanimator for the conclusion of this act to demonstrate how the various systems come together to form a modular architecture.
As we previously explored the SRT file format by way of explaining Mekanimator’s text-processing systems, we will use the same approach to discuss the Mekanimator JSON file format to understand the platform’s scene-loading and user-interface systems. Each Mekanimator scene in Play the Knave is specified in its own .json text file, written manually in a text editor (at least initially; later, existing scene files were copied and modified to add new scenes). In the previous section, we discussed the two JSON files used in the Scriptmaker program to represent the two text versions of a Shakespeare scene (abridged and full), as well as the six SRT files exported from Scriptmaker to support the difficulty and speed options for that scene. A Mekanimator scene is an additional JSON file that holds the metadata common to all text variations of a playable game scene. For example, the image below shows a JSON scene file with the metadata for a 2-player Hamlet scene, given the descriptive label “My Dad the Ghost” and saved in a game resource folder as “__ptk_hamlet_2_ghost.json.”
{
    "info": {
        "name": "__ptk_hamlet_2_ghost",
        "description": "My Dad the Ghost",
        "author": "William Shakespeare",
        "editor": "Anneliese",
        "ncharacters": "Two",
        "play": "Hamlet",
        "genre": "Tragedy",
        "theme": [
            "Famous Lines",
            "Supernatural",
            "Possible Lunacy",
            "Advice",
            "It All Starts Here"
        ],
        "characters": [
            {
                "name": "Hamlet",
                "description": "HAMLET, Prince of Denmark, son of late King Hamlet",
                "color": "#729fcf"
            },
            {
                "name": "Ghost",
                "description": "GHOST, an apparition of the late King Hamlet",
                "color": "#fce94f"
            }
        ],
        "long_description": "Act 1, scene 5:<br>HAMLET meets the GHOST of his father, who prompts HAMLET to seek revenge for his murder by HAMLET's uncle."
    },
    "subscenes": [
        "assets"
    ],
    "run": [
        {
            "name": "__ptk_hamlet_2_ghost_script",
            "file": "Text/Hamlet/2 Player/My Dad the Ghost - %level%.txt",
            "enabled": true
        }
    ],
    "connections": [
        [
            "__ptk_hamlet_2_ghost_script:text",
            "subtitles"
        ],
        [
            "__ptk_hamlet_2_ghost_script/next:text",
            "next subtitles"
        ],
        [
            "__ptk_hamlet_2_ghost_script:audio",
            "audiosfx"
        ],
        [
            "__ptk_hamlet_2_ghost_script:command",
            "commander"
        ]
    ]
}
When Mekanimator starts, there is an initial delay before the main user interface appears. During this time, Mekanimator is iterating over the folder of JSON scenes, opening each one and parsing its content to read the metadata and organize the scene library. The “info” section of the JSON file is used both to populate the game menu with the scene’s relevant information and to make it retrievable for queries, which grants the menu the ability to filter scenes based on the source play, genre, number of players, and themes. Once a menu choice has been made, Mekanimator understands which scene to load, but does not yet know which specific SRT file to load. Notice in the JSON file above that the scene’s metadata contains a “run” property containing a path to an SRT file with a %level% token in the filename. Choosing a scene in the menu requires that the player select a text version (abridged or full) and a difficulty level (slow, medium, or fast). These choices map to a number between 1 and 6, as previously described. For Mekanimator to load the correct version, the SRT filename’s %level% token is replaced with this number, and the resulting SRT file gets loaded and parsed for play, composited into a single SRTStream along with the appropriate warm-up SRT files determined by the menu selections. (Players can elect to include a full warm-up at the start of their scene; if they do not select the option for a full warm-up, then the system automatically inserts a very brief warm-up to help them establish their avatars before the dramatic scene proper begins.) Originally, Mekanimator would load all six variations of a scene as separate objects, resulting in a much longer delay at startup. To improve performance, we modified the startup scene parser to defer loading the specific text for a scene until the version and speed choices have been made in the UI, resulting in a ~5x improvement to startup time.
Each JSON metadata file also contains a “subscenes” property that usually includes a reference to a scene called “assets.” This is yet another Mekanimator scene file that contains specific configurations for every asset Mekanimator can load. When a scene is selected in the UI, the content of “assets” is merged into the selected scene’s metadata. The “assets” scene contains arrays of options for: “cast” (avatars), “scenery” (stages), “camera” (one for each stage), “lighting” (one set for each stage), “audio” (ambient sounds or background music), and “run” (modular text and templates to combine based on the selected warm-up option). Looking at the structure of “assets,” one might notice that stage, light, and camera configurations are defined separately, despite these properties generally occurring together. In the “assets” scene, we could group these configurations together as properties in a stage’s entry in “scenery,” but this approach would eliminate the option to reuse a definition in multiple contexts, such as having a single camera configuration used by two separate stages. Even without reusing lights and cameras, data redundancy is minimal as each stage only needs one camera and can only handle up to 4 lights, a number chosen to keep runtime performance manageable on lower-end systems. Anyone with experience as a Unity developer would also know that the engine supports the use of “prefabs”—prefabricated collections of objects and components organized into a hierarchical structure that can be repeatedly instantiated together as a unit—that would allow us to compile a stage with its lights and camera as a prefab and load it as a complete set in one operation, rather than maintain these game components as separate objects in the “assets” file and load them one at a time. However, the prefab approach would remove the ability to adjust the assets’ configurations in between play sessions. With prefabs, one would need to change such configurations in Unity Editor, then rebuild the project. Managing these options instead as text in the “assets” Mekanimator scene file grants greater control to the end-user and makes the change/test iteration loop size much smaller and faster: an essential situation for rapid prototyping and customization. This is another way in which we aim to satisfy our design document’s promise to blur the lines between developer and participant.
In practice, the subscene entries dictate which assets are available for a chosen scene. For the Shakespeare scenes, the default “assets” subscene is always used and the players have full selective control over the scene. But each of the scenes categorized under “Theatre Games” loads a separate subscene called “assets_games,” which automatically loads a stage (the Globe Theater) and assigns every player the same choice of avatar: a robotic character that gets color-coded differently for each player in the scene. From this, we can appreciate how Mekanimator supports a wide range of scene customization by leveraging both player selections in the game menu and data-driven approaches through subscene definitions. Together, these features allow the same instance of Mekanimator to showcase any number of scenes with varying degrees of freedom for the player’s preferences while enforcing creative constraints made by the scene’s author.
We have established that the use of asset subscenes allows scene authors to define the choices available to players when performing a scene. In addition to providing Mekanimator with a data-driven approach for scene selection and asset loading, this technique also creates a much-needed access point for asset management in the platform, consolidating the wide collection into one point of reference rather than depending on inflexible Unity prefabs or maintaining separate configurations for each asset. Serving as a catalog, the “assets” root scene is a rather clever way to tackle the issue of managing the platform’s many kinds of assets, each with their own peculiarities. For instance, by virtue of their construction, some avatars face away from the camera when loaded into a scene, so each avatar entry in “assets” contains initial values for rotation and scale to normalize their appearance regardless of their original configuration. We make similar entries for the choice of stages in “assets” out of necessity, each one being constructed at a different scale and orientation. Writing this configuration helps streamline the in-game loading process and is a one-time price paid when importing a new asset into Mekanimator.
Additionally, the “assets” subscenes are just Mekanimator scenes—text-based JSON files—which makes them easy to handle with git and Unity, allowing developers to track changes over time and instantly toggle access to an asset without forcing Unity to trigger actions to enable/disable or reimport the affected files. Later, we will show how this structure provides better support for data collection and scene replayability.
The “connections” section in a Mekanimator scene file defines names of data sources to which sinks can connect. These are created in the process of parsing the SRT file loaded for the scene. The “subtitles” and “next subtitles” entries refer to the SRTStream sources and karaoke text sinks registered to them, as described in the previous section. The “audiosfx” entry enables the playback of audio at specific timestamps. If a line entry in an SRT file contains an <audio src=”file”> tag, the file specified in the src attribute will be played when the line first appears on screen. We use this stream to play background audio selected in the game menu as well as voiceover snippets for the templated warm-up sequence composed when the scene is loaded. The “commander” data source is derived from parsing non-standard HTML tags such as <command capture=”start”> found in the SRT lines. Such commands indicate actions for Mekanimator to take at the timestamp of the line in which the tag appears. For a while, we used this method to determine when scene recording should begin and end by manually including command tags in the SRT files. This approach allowed us to designate that scene recording should occur after the warm-up instructions, for example. However, this approach quickly became a pain point for scriptwriters, so the responsibility of scheduling tasks related to recording was shifted to Mekanimator’s internal scene-loading components. This also allowed us to modularize the warm-up process, rather than depend on rigidly-defined instructions included in every single text. Besides the initial use for controlling scene recording, we had conceived of other uses for the command stream, such as making dramatic changes to lighting on an important line, spawning props in players’ hands, or switching costumes, to name a few. However, although parsing support for the command stream remains in Mekanimator as a feature, time constraints and other priorities prevented us from exploring alternative uses.
At this point, although we have described the structure of Mekanimator scene files, how exactly they get configured with player choices and loaded in Unity remains to be shown. To address these processes, we now turn to the game’s menu—the main user interface—and describe how it, as a discrete component, collaborates with Mekanimator.
“The right of voluntary choosing” | UI, Meet API
The user interface (UI) for Mekanimator is implemented as a front-end web application. It uses HTML, CSS, and JavaScript (with jQuery), leveraging techniques popular with conventional web programming, such as asynchronous functions, and promises to remain responsive while waiting for longer-running operations to finish. The choice of making a web application for Mekanimator’s UI came after thorough deliberation and review of team skills: we had no prior experience making interfaces in Unity, and we were reasonably concerned about the development time needed to do so and the platform lock-in that would result. From our initial builds of Mekanimator, tailored specifically for the Play the Knave game, we expected some of the content, such as scenes and avatars, to grow in number over the platform’s lifespan, and early demos highlighted concerns of attempting to build and stylize a modular UI inside Unity. In comparison, we had considerably more experience with web development. We reasoned that a web interface could have added benefits, such as allowing for easier collaboration between more developers and designers. After all, experience with web development is more common than experience with Unity. Moreover, the development process would closely resemble building a typical website, minimizing the need for licensing and running multiple copies of Unity Editor, while instead drawing on the rich development and debugging tools built into major browsers. In addition, we pursued a web-based UI to support a range of installation options. For example, we conceived a scenario for a public installation of Play the Knave that would involve a PC attached to a TV display and a Kinect camera, but without any mouse or keyboard. In this scenario, participants would select a scene from a smartphone or a tablet device with the browser open to the UI website. For a busy, crowded public installation of Play the Knave, having a distributed interface of this nature would give players more time to browse scene and avatar options while they waited for their turn to perform. Given that this scenario would require network communication between the devices and rely on a client–server architecture, we agreed to head in the direction of a web-powered UI.
Even while imagining different installation scenarios, however, we did not wish to create a strictly distributed design that would require a secondary device just for the game menu or force players to awkwardly switch to a web browser just to access the UI. Therefore, to run the interface from within the game itself, we used a third-party plugin for Unity that wraps the software library Awesomium, which provides an embedded version of Chromium, the open-source browser codebase used in Google Chrome and other popular browsers. Awesomium allows a program to run a self-contained web browser and supports bindings for other languages and frameworks, such as C++ and .NET. The Unity wrapper plugin for Awesomium thus allows a Unity project to support browser-based content. In short, this means that Mekanimator can directly use web technologies like HTML, CSS, and JavaScript. But this only provides front-end web support; we could create the UI as a website and host it within Unity, but it would have no innate support for interacting with the game state. Thus, we needed to incorporate a web server into Mekanimator with an application programming interface (API) to support UI interactions. The API we developed provides a discrete set of actions that can be invoked by the client (UI) on the server (Mekanimator). The supported actions include:
- get_settings and set_settings used to make persistent changes to the game’s various settings
- get_scenes to retrieve a list of scenes available for play
- get_custom_scene to load and parse a custom scene created in Scriptmaker
- get_continue_scene to load a previously recorded scene and add a new performance to it
- get_assets to load the selected scene’s asset list
- play_audio and pause_audio to control playback previews of audio assets in the menu
- load_scene and unload_scene to start and stop a scene’s execution
- quit to stop running Mekanimator
These actions unfold through the UI as a play of computational enactments, an opera of operations that repeatedly prompts the user to join in and interact.[10] When the game launches, the UI invokes the API calls get_settings and get_scenes to begin populating the options for Shakespeare scenes and theater games. Once the scenes have been retrieved, the results are saved by the UI’s JavaScript code in data structures with support for filtering by scene properties, such as genre, theme, number of players, and source play. Thus, the initial API call returns a batch of scenes in JSON format, and any subsequent UI interactions for browsing available scenes operate on the UI’s copy of these scenes. For example, when the player selects “Perform a Scene from Shakespeare,” the UI displays prompts for “Tragedy,” “Comedy,” or “History,” the main genres used to categorize Shakespeare plays. Selecting a genre on this screen, such as “Comedy,” instructs the UI to filter out all scenes that do not share the selected value for their “genre” property. Results for “Comedy” scenes are grouped by their Shakespeare source play, so the UI’s logic finds the unique set of “play” property values from the scenes remaining after the previous filter and displays buttons for each play as the next user selection. This process continues for other scene properties on each UI screen, gradually distilling the scenes to a smaller set as the number of filters increases, until the player makes a final choice.
The process is different when “Perform your Own Script” is selected, as the user is expected to choose a scene file from their own device rather than browse the built-in scene database. Selecting this option in the UI invokes the API’s get_custom_scene action, which causes Mekanimator to launch a file dialogue for selecting a custom scene .jsrt file. Before Mekanimator can respond to this API request from the UI, it must verify that a .jsrt file was selected and that the file’s contents follow the expected format. The custom scene file is parsed into a data structure compatible with the UI to expose information about the scene, such as its name and number of players. During this process, the “assets” subscene is added to the custom scene as well to prepare for the next UI stages. Finally, Mekanimator responds to the API call with the custom scene data in a usable state for both the UI and Mekanimator. This extra work is not required when get_scenes is called for the built-in Shakespeare scenes, as those scene files have already been parsed and prepared for use in both the UI and Mekanimator.
However, a similar sequence occurs if a player chooses “Build onto a Performance-in-Progress.” With this option, the UI invokes get_continue_scene, which prompts Mekanimator to open a file dialogue like the one used for loading a custom scene. The main difference is that this dialogue asks for a Mekanimator scene .json file generated as output by a previous performance. This file is only created when scene recording is enabled, but it contains all the details necessary to load the exact same scene from a previous performance. In effect, choosing this option relieves the player of having to make selections of scene, avatars, stages, and audio, allowing them to jump right into the prerecorded action. In the same directory location as the selected JSON file, one can also find the corresponding body-movement data and recorded audio files that Mekanimator can load and run when the scene begins. The intended uses for this option are playback of recordings and asynchronous play, allowing a player to not only view a previous performance in Mekanimator, but also add their own performance to it, generating a new set of recording files containing the combination of their efforts. More details on the implementation of asynchronous play will be discussed in Act IV.
Once a scene is selected in the UI, whether it is a scene provided with Play the Knave, or a custom scene that has been parsed and verified, or a performance in progress that the player wishes to continue, the UI internally manages a copy of the selected scene as an object variable and evaluates it to determine the next step.[11] This object contains all the scene’s text data as well as any of the game assets loaded from its “subscenes” property: either “assets” for the full set or “assets_games” when a theater game is selected. For theater games and performance-in-progress selections, the UI can advance to its last stage and present a start button for the scene. For Shakespeare and custom scenes, the UI must provide prompts for player avatars, stage, and audio before the start button is displayed. Beginning with avatars, the UI builds an interface by iterating over the “cast” loaded into the selected scene object from the “assets” subscene. Recall that “assets” serves as a catalog for Mekanimator. Many of the entries in “assets” also contain properties that the UI can use. Avatar and stage entries contain human-friendly labels and paths to thumbnail images to enable previews, browsing, and filtering. When an avatar is selected, the UI updates the selected scene’s data structure, finding the chosen asset’s entry and setting its “enabled” property to “true.” The UI also adds a source-sink connection to the scene’s “run” section to associate the avatar choice with a specific character name from the scene. Similar operations occur for stage and audio selections. If a player uses the back button to make a new selection for a scene property, the previously chosen asset’s “enabled” property is reset to “false.” By toggling this property, the UI determines which assets Mekanimator will load when the scene begins.
The number of possible combinations in the UI for scene selection is rather large. Between the roughly 200 scenes from Shakespeare, the 6 text options for each scene, the choice of 38n avatars (where n is the number of players for the scene), the 10 choices of audio (4 for music, 6 for atmosphere), and the 4 stages, there are between 1,824,000 combinations for a single-player scene and just over 100 billion combinations for a 4-player scene (or just over 85 billion if all 4 players want unique avatars). It is crucial to guide players through the UI’s scene selection controls in stages. For example, when performing a scene from Shakespeare, the UI prompts for the following choices:
- Genre (Tragedy, Comedy, History)
- Play
- Scene [which determines both the text and the number of players]
- Warm-up preference (Include Warm-Up or Skip Warm-Up)
- Text version (Abridged Version or Full Version)
- Text speed (Slow, Medium, or Fast)
- Avatar choices for each player in the scene (1 to 4 players)
- Audio (Music, Atmosphere, or None)
- Stage
At any point, the player can navigate backwards through the choices to change their selection or use the reset option to return to the initial UI state. For even faster selections, the UI also presents options to choose scenes or avatars simply by providing the desired number of players.
Once all selections have been made and the players are ready to begin the scene, selecting the start button in the UI invokes a 10-second countdown that eventually makes an API call to load_scene. This call expects the UI to include the selected scene object variable that has been locally maintained and updated based on players’ menu selections. Because this variable contains all the information needed to begin a scene, when Mekanimator receives it, the variable is parsed, verified, and passed over to the Controller class responsible for managing and executing Mekanimator scenes.
“Spur and stop” | Interior Mekanimator Design
At this point, the UI’s job is largely complete, and the API hands the input data off to Mekanimator’s internal behavior in the static method Controller.LoadScene. This process is the main entry point for running a scene in Mekanimator and consequently invokes several other processes to handle the tasks associated with a scene’s start:
- asset instantiation: loading character models, stages, lights, and camera
- SRT data composition, based on the selected scene text and warm-up choices
- hiding the UI while the scene is running (and making it visible again when the scene ends)
- starting the KinectDaemon process
- recording the scene and generating output files if the option is enabled
- reading and executing existing files from a previous performance if this is a continued scene
- toggling the stick-figure avatars and sync line for player calibration (see Act IV)
- connecting data sinks to their appropriate sources
- beginning the playback of the SRTStream
Let’s now take a whirlwind tour through the Mekanimator scene-startup process. The asset instantiation process is simple: the method iterates over the entries in “assets” and loads the ones whose “enabled” property has been set to “true,” ignoring the others. Some assets have straightforward instantiations, such as stages and lights. In contrast, loading a character requires additional steps after instantiating its avatar so that Mekanimator can connect it to a movement data source. Camera and audio assets are not instantiated, but rather the Unity scene’s existing camera and AudioSource components are updated according to the asset’s definitions. SRTStream composition occurs as described earlier in the act. Hiding the UI during a scene is achieved by invoking a Unity coroutine that, over 5 seconds, gradually increases the UI’s transparency until the timer expires, then finally sets the UI’s visibility to hidden. Pressing the Escape key at any point during a scene toggles the UI’s visibility, should the need arise. Next, the KinectDaemon application is launched as an external process with command line arguments to dictate which device to use for motion capture, whether to record movement data to a file, and whether to load body-movement data from a provided file. If the game options have enabled scene recording, or if the selected scene is a performance-in-progress, the arguments sent to KinectDaemon are adjusted accordingly. After launching it, Mekanimator maintains a reference to the running KinectDaemon process to facilitate shutdown after the scene ends. Audio and video recording options are configured at this point, and components are enabled to help player–avatar calibration, which will be covered in the next act. When all these sequences are complete, the scene is finally flagged as started, and the data sources for text, movement, and audio all become active and begin supplying data to their associated sinks. After a long journey (that passes by fairly quickly in real time), the game is finally ready to play!
The scene concludes at the end of the SRTStream, and another method called Controller.UnloadScene handles the teardown process to effectively return Mekanimator to its initial state. This method invokes the following instructions:
- stop KinectDaemon
- disable any active audio playback
- stop any active recordings
- destroy any loaded assets from the scene
- launch file move operations and post-processing scripts
- reset game settings
- disconnect sources and sinks
- restore the game UI
The architectural design of Mekanimator ensures that all the information necessary to run a scene is submitted to the platform by the UI. The key advantage here is that Mekanimator can run in a continuous state, loading one scene after another, with good performance and reliability, regardless of the UI selections made. However, some extra care is needed to smoothly load scenes and return the software to a ready state when they conclude. To manage certain components in between scenes, Mekanimator uses a game object with a component we call Lifecycle, named for its responsibility to oversee the platform’s behavior during its execution. This component exists for the duration of the software’s lifecycle and is responsible for maintaining references to persistent, reusable objects such as cameras, recorders, audio sources, and the text display systems. When the game is first launched, Lifecycle performs administrative tasks, such as verifying that the game’s recording directories are reachable and initializing the UI and API. It also contains the methods used to identify device names, open file dialogues for loading custom or continued scenes, apply settings saved in a JSON file, and log errors. This component also maintains a list of updatable objects loaded by the Controller class, invokes their update methods as part of the platform’s main execution loop, and destroys these objects before the application quits.
“As record of fair act” | Capturing the Magic
One of Mekanimator’s original goals was to save digital performances in a persistent format. We intended to use this feature to provide video souvenirs to players at the 2015 Stratford Festival and similar installations. We explored a few different options, some within Unity as plugins and some as external products that would rely on a form of inter-process communication. Such products included Open Broadcaster Software (OBS) (released in 2012), Nvidia ShadowPlay (released in 2013), and ffmpeg (released in 2000). OBS showed great promise at the time of its release, but we were cautious about the ramifications of using external software as a primary feature, requiring users to install and configure OBS alongside Mekanimator for correct usage. The same problems were present with ShadowPlay, with the additional hurdle of the software only working for Nvidia graphics hardware. Ffmpeg also showed promise but had mixed results on different systems. Ultimately, we decided to choose an internal Unity plugin for scene recording, making it easier to invoke at the right moment and more carefully specify the screen contents that should be captured.
After searching through options on the Unity asset store, we quickly decided on the AVPro Movie Capture (referred to henceforth as AVPro) by RenderHeads Ltd., which offered the best performance for real-time capture and gave various configuration controls to achieve balance between performance and quality.[12] It is important to acknowledge in a modular architecture design that, while Mekanimator alone has low computational demands for a game, if care is not taken, the execution of various components alongside it can quickly tax the system resources of some midrange Windows computers. The Kinect hardware is fairly demanding when processing body movement, but up to this point, we had been capable of running Mekanimator scenes indefinitely, even with 4 players at a time. As we added support for video capture, however, we had to be careful to keep the game performing well across different systems. For instance, Mekanimator usually runs at 60 frames per second at a 1080p resolution, but recording at these same values was problematic on all but the most capable of our lab computers. Given that the Kinect’s refresh rate is 30 Hz and that souvenir videos don’t necessarily need to be a 1:1 representation of the performance, we configured AVPro to perform screen capture at 30fps and 720p resolution, restoring balance across most systems.
Another issue came from the recording source. Essentially, the AVPro plugin could record the view from the Unity scene’s main camera more quickly than from another configuration. For example, it was possible with the plugin to record a performance without the karaoke text being visible, but this required changes to the rendering pipeline: instead of rendering the scene’s content directly to the screen, we would need to render the desired 3D content (avatars, stage, lighting) to a RenderTexture object first, which AVPro would then copy and encode into the recording.[13] After this, the RenderTexture content would be displayed on the screen with the karaoke text displayed as an overlay. In doing this, we observed more dropped frames in the saved videos than when recording directly from the game’s main camera, so we reverted the rendering pipeline back to its original form.
Although AVPro supports audio recording, we soon ran into issues trying to use it. The plugin provides options to capture audio from the game’s sources or directly from an input device. For the virtual souvenir video to be complete, we must capture both the players’ avatar movement on the stage and their voices during the performance. The Kinect devices have built-in microphones, so we configured AVPro’s audio capture to target the Kinect device. The Kinect microphone registered as a sound device in Windows and was recognized by the plugin, but the recordings would lack audio, or only capture a few seconds at the scene’s start, or in some cases the plugin would fail to record anything at all for video and audio. This problem did not occur with other microphones, such as a laptop’s built-in mic, but the Kinect microphone provided better voice quality for a wider range of play environments. For whatever reason, however, the Kinect microphone was not reliable with AVPro. We thought this might have been an issue with the KinectDaemon application monopolizing access to the device to process and stream motion capture data, but then we tried launching ffmpeg with parameters to pipe the Kinect microphone’s audio directly to a file while a scene was running and this worked! So, that became the standard Mekanimator method for recording audio. When a scene concludes, the Controller.UnloadScene method instructs AVPro to stop recording video and sends a signal to the ffmpeg process to stop recording audio. The souvenir contents are complete, but in separate parts. After the scene ends and all recording processes have stopped, we launch another ffmpeg process that merges the audio and video files together, with additional flags to make the video more suitable for playback.
Since the video and audio are recorded as separate processes, it is possible to encounter synchronization errors when merging them. If the two processes do not start and stop together, the resulting files can be different lengths. Even when the recording commands are carefully executed to be in sync, we encountered situations where the audio and video gradually drifted out of sync in the finalized recording. In such cases, the audio playback sounds fine, but the video starts to fall behind. This tended to occur more often on lower-end computers, and especially after the first scene was performed. After monitoring performance, we surmised that the most likely cause of this drift came from starting a scene in Mekanimator right after another had concluded. The post-processing steps to merge, move, and upload the previous scene’s files all require system resources, putting a strain on Mekanimator as it strives to record and encode the scene currently underway.
“Send thither to see” | Sharing the Goods
When Mekanimator is installed for personal use, the finalized souvenir video is saved into a folder on the system’s desktop. The individual files, however, are kept in the game’s “record” folder, which contains the video recording from AVPro, the audio recording from ffmpeg, the movement data from KinectDaemon, the Mekanimator scene selected in the UI, and a subtitle .srt file of the scene’s text to accompany the video. Settings exist in Mekanimator to automatically clean up these files after generating the video souvenir, or to simply not record any of them at all. For event installations, we wanted the option to automatically upload the finalized video, movement data, and scene file to a ModLab server so that the video souvenir could be sent to the player’s email address. To achieve this, another process was created called MekWebBuddy. If the upload feature is enabled in the game’s settings, Lifecycle launches a process for MekWebBuddy. This program watches a directory called “upload” for new files. When it detects a new file in this folder, it attempts to upload the file to the ModLab server. If the upload is successful, MekWebBuddy deletes the local files, and the ModLab server generates a link to the souvenir video. If players provided an email address in the UI before starting a scene, the ModLab server would email the player a link to their video.
To protect the ModLab server, MekWebBuddy needs to provide a valid username and password combination before file uploading is permitted. When preparing for an event installation, we would create new credentials on the ModLab server and include them in the Mekanimator settings file on the machine being used for the event. This also allowed the Mekanimator team to browse uploaded performances under each event name. In the earliest usage of this feature, this gave us essential feedback for identifying and resolving bugs with text display, avatar animation, audio processing, and more. To prepare for the Stratford Festival installation, we had switched AVPro to use a fast pixel format for recording, which promised better performance. But we quickly found out that the resulting videos were visually much darker than the game appeared on screen. This helped us track down the issue, identifying improper color space conversion in one of AVPro’s shaders used to capture video.[14] We fixed the plugin’s shader, rebuilt the game, and deployed it on the event computer.
The process of building and deploying Mekanimator is also modular in nature, which should come as no surprise at this point. To cover multiple use cases, we wrote scripts to automate the build process in Unity. Our build script allows us to set whether the build should enable recording and uploading files, and whether it is meant for use at home or at an event installation. For event installations, we can supply a build with the username, password, and event name to use for server uploads. For personal builds, these options are ignored and uploading is disabled. External programs such as KinectDaemon, MekWebBuddy, and Mekanimator’s web tools (the UI and Scriptmaker) are copied into the build folder as well. The SRT files used for Play the Knave are copied into the build folder, allowing users the freedom to browse, modify, and repurpose the files as they so choose.
When the build process is finished in Unity, the resulting “build” folder in the project directory is almost ready for deployment. This folder contains about 1,700 files across 149 folders and occupies 1.35 GB of space uncompressed. Initially, we mitigated this by including a stage in the build process to compress the folder into a ZIP archive for easier sharing. Doing so is clunky for most users, however, and the software’s extraction might be blocked by Windows—a common experience when attempting to open a .zip file that contains an .exe file. Instead, we switched to using Nullsoft Scriptable Install System (NSIS), an open-source tool to create software installers on Windows, which provides a much nicer install experience for the user. The installer executable created by NSIS allows the user to customize the install path and the creation of shortcuts with a typical install wizard. More importantly, the executable is about 383 MB as a single compressed file, making it much easier to both share on the ModLab server and download as a user.
“Put into parts, doth keep in one consent” | The Definitive ModLab Collab
In this act, we introduced the modular software philosophy that inspired and guided the architecture for Mekanimator. To see this in practice, we proceeded to explore the individual components and systems used in Mekanimator, starting with the text-handling systems. We then leveraged the basis of understanding for these systems to introduce related but independent components that control how scenes are handled in Mekanimator. This led naturally into the UI and API systems, which finally brought us to the inner core of the Mekanimator platform. We then left the platform’s center to understand how the recording and uploading features fit into the process, with a final stop on the software build-and-deployment process. By stepping through these systems one at a time, we aimed to gradually provide an end-to-end account of the platform. These systems comprise rich software components that reflect the principles of the Unix philosophy, described aptly by Brian Kernighan and John Mashey:
Complex procedures are created not by writing large programs from scratch, but by interconnecting relatively small components. These programs are small and concentrate on single functions, and therefore are easy to build, understand, describe, and maintain. They form a high level toolkit whose existence causes programmers to view their work as the use and creation of tools, a viewpoint that encourages growth in place of reinvention.[15]
By using a modular approach to the software’s architecture, we spent more effort opening future possibilities than reacting to changing requirements, and we were able to make great strides in short amounts of time.. The isolation of certain features, while intimidating at first, became a hidden strength that provided us with depths of understanding and appreciation for the platform’s components. At the project’s beginning, planned features existed in something like rough outlines in the codebase, almost as placeholders, only to explode in functionality after a fateful repository commit. This allowed us to design, implement, and test components in near isolation from the larger system, resulting in a collection of tools that, while individually fairly useful, constituted a much greater platform for Mekanimator. Integrating these components to work with one another was startlingly easy thanks to the clear vision articulated in the project’s design document. Simply having a consensus on how the platform should work helped us reach that state in time for the first major event installations. Then, as we discussed in Act II, as more people tried Play the Knave, new needs and applications arose for the platform, which were often straightforward to address by either modifying existing components or adding new ones.
To conclude this act, we present a timelapse video of Mekanimator’s git repository history generated by the tool Gource.[16] This visualization of the project’s changing structure over time portrays an interesting story of various collaborators coming together, creating bursts of activity before major milestones, to collectively build the Mekanimator platform. Separate components seem to occupy their own nodes in the connected project structure, depicting the elegance of modular software design. As the platform’s assets begin to outnumber its source files, the amount of data required for producing Play the Knave as a module of Mekanimator is highlighted. Over time, activity in the repository begins to drop, allowing the project structure to converge into a more complete and final state. Although active development on this version of Mekanimator has largely settled down, the platform as described in this act persists as a vibrant concept and shining example of modular software. We like to think that Mekanimator realizes in the form of software the mythos of good government that Exeter lays out on behalf of Henry V: “For government, though high and low and lower, / Put into parts, doth keep in one consent, / Congreeing in a full and natural close, / Like music” (Henry V, 1.2.187–190). Mekanimator’s modular architecture, with its many parts “congreeing,” not only cohere to make Play the Knave possible, but they also invite, nay require, the player to participate in making the music. In its design, Mekanimator embodies the harmony of the collaboratory.
See Unity, “Scripting API: RenderTexture,” v. 5.6, Unity Documentation, July 12, 2017, https://docs.unity3d.com/560/Documentation/ScriptReference/RenderTexture.html.
See Unity, “Scripting API: RenderTexture,” v. 5.6, Unity Documentation, July 12, 2017, https://docs.unity3d.com/560/Documentation/ScriptReference/RenderTexture.html.
See Unity, “Scripting API: RenderTexture,” v. 5.6, Unity Documentation, July 12, 2017, https://docs.unity3d.com/560/Documentation/ScriptReference/RenderTexture.html.
See Unity, “Scripting API: RenderTexture,” v. 5.6, Unity Documentation, July 12, 2017, https://docs.unity3d.com/560/Documentation/ScriptReference/RenderTexture.html.
The SRT parsing code substitutes HTML tags for Unity-compatible rich-text formatting tags, so the actual count for this line would be somewhat lower. However, the comparison is still sound.
The SRT parsing code substitutes HTML tags for Unity-compatible rich-text formatting tags, so the actual count for this line would be somewhat lower. However, the comparison is still sound.
The SRT parsing code substitutes HTML tags for Unity-compatible rich-text formatting tags, so the actual count for this line would be somewhat lower. However, the comparison is still sound.
The SRT parsing code substitutes HTML tags for Unity-compatible rich-text formatting tags, so the actual count for this line would be somewhat lower. However, the comparison is still sound.
See “Download Shakespeare’s Plays, Sonnets, and Poems,” Folger Shakespeare Library, 2023, https://www.folger.edu/explore/shakespeares-works/download/.
See “Download Shakespeare’s Plays, Sonnets, and Poems,” Folger Shakespeare Library, 2023, https://www.folger.edu/explore/shakespeares-works/download/.
See “Download Shakespeare’s Plays, Sonnets, and Poems,” Folger Shakespeare Library, 2023, https://www.folger.edu/explore/shakespeares-works/download/.
For an overview of the software components of Mekanimator, including all third-party code and corresponding license details, see ModLab, “Mekanimator,” ModLab: An Experimental Media Laboratory at UC Davis, August 30, 2023,
https://modlab.ucdavis.edu/digitalprojects/mekanimator/
. On the practices and politics of free and open-source software, see Kelty, Two Bits; and Coleman, Coding Freedom.
Here we intersect with the field of platform studies, which examines how the technical features of hardware and software both enable and delimit creativity, thereby shaping the contours of digital culture; see Montfort and Bogost, Racing the Beam, and Anable, “Platform Studies.” We align particularly with James W. Malazita, who has argued that platforms are not mere crucibles of media creation but are instead mutable actors, multiply enacted in response to shifting development goals, cultural expectations, and systems of power—and capable of becoming otherwise; see Malazita, Enacting Platforms.
Here we intersect with the field of platform studies, which examines how the technical features of hardware and software both enable and delimit creativity, thereby shaping the contours of digital culture; see Montfort and Bogost, Racing the Beam, and Anable, “Platform Studies.” We align particularly with James W. Malazita, who has argued that platforms are not mere crucibles of media creation but are instead mutable actors, multiply enacted in response to shifting development goals, cultural expectations, and systems of power—and capable of becoming otherwise; see Malazita, Enacting Platforms.
Here we intersect with the field of platform studies, which examines how the technical features of hardware and software both enable and delimit creativity, thereby shaping the contours of digital culture; see Montfort and Bogost, Racing the Beam, and Anable, “Platform Studies.” We align particularly with James W. Malazita, who has argued that platforms are not mere crucibles of media creation but are instead mutable actors, multiply enacted in response to shifting development goals, cultural expectations, and systems of power—and capable of becoming otherwise; see Malazita, Enacting Platforms.